
Newbies: Learn about formatting posts here! 📖

When you were new in the community, creating different post formats can be tough. If you are confused about it, this guide will cover all the sections.
To start a discussion, go to the area you want to post it and click on this button:

If you click on the drop down, there are more options. You can ask a question by clicking on "Ask a Question." If you have reached Level 3 in the community (make 50 posts) you can create polls by clicking on "New Poll."

To create a new idea, go to the Ideas section of the community (only CC games and a few others). Click on this button:

To comment on a discussion, scroll down and start typing in the text box. You can also start a comment by quoting someone. To do so click on "Quote" and a comment will be started. The emojis on the bottom of each comment are feedback for a discussion, question, poll, or question (not for ideas). Clicking on one of them will give the poster a "reaction." On the very left, you can report a post by clicking "Flag" then "Report." Different reasons for flagging: Spam, Inappropriate, Duplicate, Off-Topic, etc.

You can also post on your or someone else's wall. You will get the same box, but not when you comment on a wall's post.
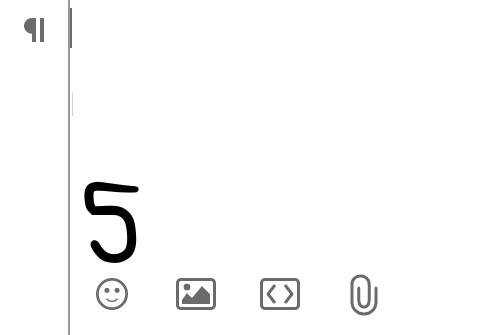
Once you have done one of the actions above (New Discussion, Question, Poll, Idea, Comment, or share Wall Activity), you will have a blank text box, as shown below. (Note: If you have been writing for a minute, there will be a message called "Draft Saved at Hour:Minute." It will be saved in the drafts if you don't post it.

You will find small icons on the bottom of the the box. (Mobile)

(Computer)
Button 1 tells the size and format of the text. Click on it to see how it works.
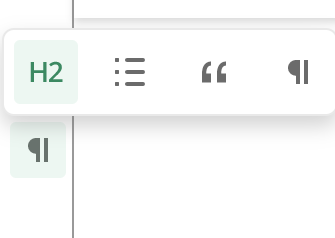
The button on the very left (H2) represents the size of the text, usually used in headings. You have four options.
H2: Gray Headings
H3: Gray Subheadings
H4: Gray Subheadings
H5: Black Subheadings
The button on the far right is paragraph. For example, what you are reading right now is in paragraph font.
The button on the right of the Headings is the list.

This is how a bulleted list looks like:
- Candy Crush Saga
- Candy Crush Soda Saga
- Candy Crush Friends Saga
- Candy Crush Jelly Saga
Ordered:
- Candy Crush Saga
- Candy Crush Soda Saga
- Candy Crush Friends Saga
- Candy Crush Jelly Saga
Indented lists look like this (both bulleted and ordered). Click on "Indent" next to one line to indent it.
- CCS
- CCSS (This is indented.)
Outdented lists look like this (both bulleted and ordered):
- CCS
- CCSS
The button the right of the lists is the special format button.

This is what quotes look like. To see how many levels deep the gray line should be folded, please click HERE.
This is what a code block looks like.
This is a spoiler warning, often used in contests.
That's all for the first of the icons.
You can also highlight text at any time to make it bold, italic, strikethrough, code, or link.

Click B to make Bold Characters. Please note that sometimes this is considered threatening, however, and might go against the house rules. Click I to make Italic Characters. Click
Sto makeStrikethroughs. Click {..} to create a special code format (this is different from the code block):Candy Crush SagaClick 🔗to create links.

Another basic is tagging. To notify someone click the @ symbol and then type in their name.
Click on his or her username. Once you make the post, that person will be notified. Please note, however, that if you tag someone when editing a comment, he or she will NOT be notified. Also, if you tag someone on a wall, they will not be notified.

You will know you tagged someone if you mouseover it and it becomes green, when you click on it you will get to his or her profile.

You will not be notified if you tag yourself.
If you tag someone for the first time, you earn the "Name Dropper" Badge.
The second button to learn is the "Photo" Button, a landscape icon located right to Text Formats on mobile and right of Emojis on a computer. If you click on it, you will be able to choose a photo (or gif, if you have reached Level 3 in the community), then it will appear. This works the same as copying and pasting.
The third button is the "Media" Button. To insert media (gif or video) type the URL of it and click enter. This is not recommended for gifs however. For gifs it is best to use the copying and pasting method.

It is extremely helpful if somebody asks for help and you tell them to read a post. The URL of the post will result in the following format:
The fourth button is the "File" Button. It is where you select photos, and instead of a photo, the link of the photo appears.
Example:
This actually works the same as the Media Button if using the URL of a photo, such as a screenshot.
Note that you can delete images, media, or files by clicking on it, then the Trash Can on top. However, for photos, you can add alternative text by clicking on the person icon. You can also select size by clicking on the button next to it.
The fifth icon is the Emoji icon. It works very simple: If you click on it and select an emoji, it simply appears besides the blinking line.
Hope the guide was helpful, if you have any questions, please comment below.
Comments
-
That was so helpful! Thank you for your sharing these guides! @FlaringCrystal120 👍😄
I will tagging @DeepshikhaSharan and @Lola_Pop check this post! 😉
-
-
Nice guide @FlaringCrystal120.
Tagging some players:
@Yosca, @Jasmina, @ArmyArms, @firebombmarkus, @frenioz00, @Spinnifix, @Sofia1992, @Julie_Andrews, @Elsa, @imabearnut, @siti_payung, @Sukanta_Biswas, @Deryck, @christine88, @encantes, @DeepshikhaSharan, @Sharon_Loose, @Acv, @Scooterpie, @Sammyjo, @aijaziqbal, @Trish24, @lilac1015, @hechicerilla, @wykoon, @teresawallace44, @Pcj, @Pitty_Kitty, @MightyWolf, @Elenna, @Tzvi_Marcu, @ElenaVorona, @MollyMolls, @007jayc, @fabke, @ChrisMiller, @wmrebulgurl68, @CerbeRus777, @quavo4, @crippso69, @ashleystump, @DawnieC, @arosefrog, @Myway2380, @FlaringCrystal120, @kam1969, @lilmamachrislong34, @fiho2004, @kaosha_1981, @wabsy246, @dee0718, @ColorfulGoat, @LunaticLeah, @Liana_Centanaro, @Aurorabeam, @DaniN68, @TWIZTID_ANGEL39, @Mendell, @Sameeksha3, @DoubleB423
@RobinCorte , @samm_kml, @Glenn1972, @SabrinaM, @KingChewy, @johamilton, @kiara_wael, @Werner_Cichy, @Nck, @Nat09, @bearwithme, @paul5473, @Crimson_Dawn, @Chicken_Slayer, @MiaChristine, @candycrushinit, @flew66, @BQN537, @gr33n3y3z, @PummyRaj, @ShannaSkywolf, @Albert_Heinrich, @Byrd59, @sarma_palash123, @Marzia333, @tininha1975, @Peter_Tornaros, @Ashraf, @Mary_Kay, @LoveDachs, @PrettyBubbles, @MountainMom, @RegalRenz, @Princess_lovely, @pearl_chetna, @SBH, @Yorben_Goeree, @rajdeeptb, @Leslie_B, @Nix66, @NamTruong2001, @mercerik, @Anahita_2005, @Pcj, @ipete, @Origins7_Dale, @Loveth_NP, @BlueberryCupcake, @MollyS, @lemcbl, @Iffu2, @me6412, @CandyCrushIsCool, @Shilviya18, @Freddy_Falkner, @DieOmimi, @Cagnes, @cjay63, @Twi, @Alex18, @一氧化二氫, @NelaMezdrea, @Cristina_20, @Greymane, @WonderlandCentury789, @MysticalMisty2, @larasofiasofia, @yonahselcy, @MollyS, @crabapple, @Marriam1, @johan1082010, @Icicle_246, @jeanps, @BubbleGumSoda, @fable1707, @smnafiz, @bekicrusher, @Annwat, @plushytoysfan
-
That's most detailed information ever on how to Write your own first comment edit and adding different post format's. Well done @FlaringCrystal120 👏
Thanks for tagging me @WonderlandCentury789 😊
-
-
-
-
Thanks for the tag @WonderlandCentury789 .
Nice info @FlaringCrystal120 . Wish it had been available back then, when I was a newbie 😉
-
Awesome @FlaringCrystal120 well done!👏👏👏👏👏👏👏👏👏👏👏👏👏👏👏👏👏👏👏👏👏
Tks for tag @WonderlandCentury789 😉😉


